Monday 29 October 2012

Chocolate Ice Cream

I have few egg yolks left after i make this Swiss Meringue Buttercream, so i search internet to see what is the best way to use up all my egg yolks. :) Do not waste food... hehe 

Finally i came across this recipe and it happen i have all the ingredient in my fridge and since i wanted to make ice cream for long time ago, straightaway i decided to make this and immediately i go to kitchen and start work. :) 

Recipe adapted from my123favourites and i make 2 batches of this (Just double everything)
Ingredients:
2 egg yolks
20g Castor Sugar (i omit this since my chocolate is semi sweet)
200ml Milk
50ml Daily whipping cream
65g Chocolate 

Method:
1. In a mixing bowl whisk egg yolks and sugar until sugar dissolve and mixture turn pale. (using handheld mixer - speed 3)
2. Using a pot, warm milk and dairy whipping cream until it is about to boil and leave the stove. Let it cool until warm to touch, around 70c 
3. Pour warm milk into egg yolks mixture and whisk continuously (handheld mixer - speed 2). To prevent egg yolk mixture getting cook
4. Pour the mixture back to the pot and cook until slightly thicken with low flame. Add in chocolate and stir well to combine.
5. Stir the mixture and pour into ice pop mold or air tight container. Keep in freezer for a least 4 - 6 hours or overnight before serve.

Thursday 25 October 2012

Swiss Meringue Buttercream

I always like to frost my cupcake to make them look beautiful and lovely. But the normal buttercream is such a turn off. :(  It is for me way too sweet. 

But worry no more, i discover this Swiss Meringue Buttercream which is using egg white and castor sugar. :) Thanks to my favorite blogger Wendy for her recipe.  Using Castor sugar and i can adjust the sweetness according to my own preference. ya-hoo.... I am going to make this for my girl birthday cake. She is requesting Castle cake for home celebration and princess cake for school celebration. =.=" my girl thought her mummy very good in baking...OMG. But i like the challenge and i will sure i can make it. Stay tune for my castle and princess cake post. :p hahaha 

This is my 3rd attempts and finally i got it right. :( looks easy but in actual fact, not really.
Little notes: Do not make the water too cold or warm. You will not get the desire texture. 

Ingredients:-
60g Egg whites
85g Castor Sugar (original called for 100g)
170g Butter (take out just before start heating the egg white)

Method:-
1. Put sugar and egg whites in a large heatproof bowl, place over a simmering water (double boiler) and constantly whisk until hot to touch and whisk until sugar dissolved. The mixture will looks like marshmallow cream. 
2. Remove from the heat and continue whisk about 5mins till peaks are stiff, thick and glossy. (speed 3)
3. Place the bowl of meringue on top of the large bowl. (DO not use cold water, Not icy water). Now add in butter, beat until smooth before add in another. Continue beating and beat until smooth. 

Monday 1 October 2012

Jelly Mooncake with single yolk

As i mention in early blog snowskin mooncake, i am not a big fans of mooncake but since this is Mid Autumn Festival and all my favorite bloggers are busy with mooncake, i also want to try it out. :) I had tried snowskin and now i tried on Jelly type. :) 

This is easier then i expected, but of course there are still room to improve in term of the presentation :) haha

Here are the recipe and again i tweet the sweetness because i and my family member cannot take sweet food. So if you prefer, you may check out original recipe Jelly Mooncake 


 Ingredient for the jelly yolk:
160g water
20g sugar
1/4 tsp agar-agar powder
1/8 tsp salt
1  piece pandan leave -knotted
Method:
1) Put all ingredients into a sauce pan and cook till boil.
2) Add in a drop of egg yolk colouring and filling up a egg jelly tray. Allow to set.
* It is very soft so handler with care :)


 Ingredient for filling:
30g sugar
1/8 tsp salt
2 tsp agar-agar powder
2 knotted pandan leaves
300ml water
150ml coconut milk
Method:
1) Boil water, agar-agar powder, sugar, salt and pandan leaves in a sauce pan.
2) When boils, add in coconut milk and stir with a hand whisk till boiled. Once boil take of the stove.
3) Pour into small cups and put in a jelly yolk. Allow to set before use
* This set quite fast around 5mins 
 Ingredient for the skin:
50g sugar
1/4 tsp salt
21/2 tsp agar-agar powder
2 knotted pandan leaves
400ml water
1/2 tbsp condensed milk
50ml coconut milk
some strawberry paste and some yam paste

Method:
1) Boil agar-agar, sugar, pandan leaves and salt in a sauce pan.
2) When boiled, lower heat, add condensed milk and coconut milk stiring continously with a hand whisk till mixture start bubble. Take off from heat.
To assemble:
1) Pour the skin agar-agar mixture into the mooncake jelly mould, filling about 50ml. Allow it to reach half set and scratch it with a fork then put in the ready made filling with yolk.
The ready made will sink a bit into the skin layer.
2) Pour the top agar-agar mixture till reach the top of the mould.

Tuesday 4 September 2012

香兰冰皮迷你月饼 (Pandan Snow skin mini moon cake)

Lantern festival is just around the corner and everyone is 'hot hot' making mooncake either bake or non-bake version. Actually myself is not a mooncake 'fancy' but somehow my friend show me a snowskin recipe which is so easy and i cannot resist to try it out myself :) hehe

snow skin mooncake by jamielow117
snow skin mooncake, a photo by jamielow117 on Flickr.

Here are some history of Latern festival :) History
Here's the recipe and i reduce the sugar since the Lotus filling is kinda of sweet for my taste bud :)

Feel free to checkout original recipe Jane's corner

Snow Skin
Ingredients:

100g Koh fun (commercial fried glutinous rice flour)
75g Icing sugar
32g Shortening
80g Cold pandan juice (3 screw pine leaves add with 120ml cold water, blend together and sieved to get juice)


Fillings
290g white lotus paste (divide into 10 portion, 29g each)

Method:
  1. Sift Koh Fun and Icing sugar into a mixing bowl.
  2. Rub shortening into the flour mixture.
  3. Gradually mix in cold pandan juice and mix to form a soft dough.
  4. Scale and weigh 29g per portion for each mooncake. (According to the size of your mooncake mould.)
Assemble
  1. Wrap each portion of filling with a portion of snow skin.
  2. Press into mooncake mould (make sure it is oval shape).
  3. Knock out and chill before serving

Mango Cheese Cake

I always wanted to try non-bake cheese cake but i just do not get the chance or reason for me to do that since my family member not cheese 'fancy'.. haha. but today i have the chance because i promise my colleague to made him a belated birthday cake :) he is drooling for my version of mango moose cake but i do not have time to bake that so non-bake cheese cake come to my mind ;) He love cheese... office colleague most of them also likes cheese ... wakakakakaka... this is the time :p

DSC01777 by jamielow117

DSC01777, a photo by jamielow117 on Flickr.

* My cheese taste a bit "Q Q" because i put a little bit more gelatin :p because i scare it won't set properly... haha

* Top layer too soft... maybe i didnt cook enough. very tiring to keep steering you know.. haha
* Biscuit layer .. i think quite good but got comment too hard :p maybe too thick since original recipe called for 10" pan but i use 9" pan ... hohohoho

But overall i am quite satisfied with the result :) and most important birthday "boy" ate 2 pieces ... hahaha

Ingredients:
Base:
300g Digestive Biscuits (crushed)
100g Butter (melted)

Filling:
(A)
200g Mango Puree
50ml Mango juice
1.5 tbsps Gelatine

(B)
375g Cream Cheese
100g Castor sugar
1 tbsp Lemon juice
200g Whipping Cream

Method:
1. Mix the melted butter with the crushed biscuits and press onto a 10" round loose base pan. Freeze.
2. Cook (A)-double boiling, until gelatine disolve and cool.
3. Beat cheese and sugar till creamy
4. Add in lemon juice then (A)
5. Beat whipping cream until firm and mix into the cheese mixture.
6. Pour onto prepare pan and chill until firm

Topping:
Ingredients:
300g mango puree
75ml mango juice
1 tbsp Castor sugar
3 tbsps Cornflour

Method: 
1. Cook ingredients in a pot until sugar disolve and turn slightly thick.
2. Cool slightly and pour onto firm cheese cake, chill again until the topping turns firm.

Sunday 27 May 2012

Ondeh-Ondeh

Actually i not really eat a lot of kuih before and i do not know why... what i usually ate for breakfast during my kids and youth time? hehe :p  But although i seldom eat kuih but i still have few of my favorite kuih :) 
1. Ondeh-Ondeh
2. Chai Kueh (菜粿)
3. Ang Ku Kueh
4. Kuih Ketalap 
and i love the most is (lor mai chi) ... :) yummy-licious


This is first time i make this and i am quite happy with the outcome :) next time i will put MORE palm sugar and cook a little longer so sugar fully melt

recipe refer Nasi Lemak Lover 
Ingredients:
250 g glutinous rice flour
30g tapioca flour
235 ml Pandan Juice (blend 20pcs of pandan with 250ml water)
100 g gula Melaka (Palm Sugar), finely chopped
100 g grated fresh coconut
1/4tsp fine salt

Method:

1. Combine the glutinous rice flour and tapioca flour in a mixing bowl, slowly add in pandan juice and knead till smooth.
2. Steam grated coconut with salt for about 3mins, set aside to cool.
3. Bring a pot of water to boil. Pinch a small piece of dough (10g each) and flatten lightly. Fill in palm sugar in the center and seal it and lightly roll them into a ball.
4. Cook the balls in the boiling water, when the rice balls float to the surface, continue to cook for another 1-2mins.
5. Remove them and coat with grated coconut.


Monday 14 May 2012

Mango Pudding 芒果布丁

I have been sick for almost a month and now finally i sort of recovered ... sigh :( pity me

I had bookmarked this recipe for LONG time because my gal love pudding but i just do not have the energy to make it. Also i find it so hard to get mango concentrate because i used 3 weeks to search for it. Tesco, 99 Mart, Giant, Carrefour and those small shops, i just cannot find it ... OMG!!! Then finally i got 1 botol of mango + apple concentrate... who cares i just grab it because of the word MANGO. hahahaha 

Luckily the taste is still good... haha and my gal love it so much and keep says this while she is eating the pudding "Mummy make this... yummy yummy' ... hahahahahahahahahahahahaha :D

Recipe refer here Table for 2 or more  .. some might ask Wendy again? hehehe.. i trust her recipe ma :p
I change the recipe a littler bit just to personal preference, you are welcome to get the original recipe from Wendy's blog :)
 
Ingredients:
20gm konnyaku powder (no malic acid added)
170gm sugar
1.5L water
100 gm creamer powder (coffeemate)
200ml mango concentrate 

Original recipe use Nata de coco but i change it to used fresh mango because i scare my gal choke :) 
Maybe next time half half :p ... haha

Method:
1. Mix sugar and Konnyaku powder together
2. Boil water, then add in creamer. Stir to dissolve.
3. Slowly spoon in sugar mixture.
4. Stir well, and let simmer for 10 minutes on low fire, stirring once in a while
5. Fill moulds with Nata de Coco with desired amount.
6. Turn off fire and pour in mango concentrate. Stir.
7. Pour jelly mixture into moulds. Chill well before serving.

Saturday 21 April 2012

Lemon Cupcakes with Lemon Cream Cheese Frosting

I baked this for my peer in office to celebrate his coming birthday :). At first i thought want to bake mango moose cupcake but i have no plan on how to finish my whipping cream if i open to make the mango moose so i put on hold 1st. While i am surfing on FB and i saw this video recipe posted by Laura (i watch ALL of her video.. hehe) and i check on my fridge, yes... i have lemon on hand. So, lemon cupcake it is... :) 


Recipe adapted from LauraInThe Kitchen with personal adjustment because usually westerner have sweet-tooth compare with Asian 

Ingredients: Lemon Cupcake
190g All Purpose Flour
1 tsp of Baking Powder
¼ tsp of Salt
150g Caster Sugar

125g Unsalted Butter at room temperature
2 Eggs
60ml Whole Milk
¼ cup of Sour Cream
2 tsp of Freshly Grated Lemon Zest
1 Tbsp of Fresh Lemon Juice
½ tsp of Vanilla Extract
 

Method:
1. Preheat the oven to 180c, line a 12 piece cupcake tin with liners and set aside.
2. In a small bowl, whisk together the flour, baking powder and salt, set aside.
3. In a large bowl, using a hand help whisk or you can do this in a big standing mixer, cream together the butter and sugar, add the eggs and incorporate well.
4. Add the sour cream, milk, lemon zest and lemon juice and mix until its all well incorporated.
5. Add the dry ingredients to the wet and mix them in to combine but make sure you don’t over mix.
6. Using a large ice cream scoop, divide your batter evenly in lined muffin tin. Bake for about 20 to 22 minutes or until a toothpick inserted in the center of a cupcake comes out clean. Let them cool completely on a wire rack.

Ingredient: Lemon Creme Cheese Frosting
Ingredient:
28g Unsalted butter
40g Icing sugar
60g cream cheese1 tsp Lemon zest
1 1/2 tsp Lemon juice
1/4 tsp Vanila extract

Method:
1.  In a large bowl using a hand help whisk, cream together the butter and cream cheese. Add the remaining ingredients and mix until you have a creamy frosting.
2. Spoon on each cupcake and enjoy!

Thursday 19 April 2012

Mango Mosse Cake

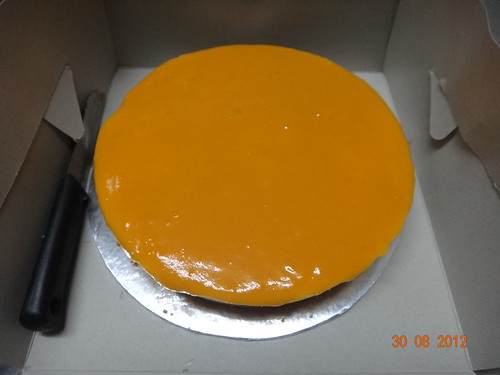
I baked this cake for my HB birthday and he love it :) But my parents do know like it because they are not so flavor to whipping creme which i use quite a lot in this recipe ... Moose right, if not creme where to find moose :P

So, at the end my colleague was my victim again. hehe.... i brought this to office and surprisingly everyone seems to like it ... some a lot, some a bit and some comment still got room to improve :p ... i took all this as positive comments so i will improve again next time if i bake again ... hohohohoho

Verdict from 1 of my colleague:- This is the BEST homemade mango moose cake he ever tasted .....
iam flush ........... speechless............. hohohohohohoho...... "BANG" knock on the wall because laugh until eye cannot open ma... :p
The top layer should be jelly but somehow my jelly failed to set so i scrap it off 

Recipe adapted from Anncoo Journal with some personal adjustment and i feel so shy because her cake looks so perfect and beautiful ... it is ok next time my turn to be so nice .. hohoh

Ingredient: Sponge Cake
4 Large Cold eggs
250g Premix flour
50g cold mango yogurt
60g Corn oil

Method:
1. Put all the ingredients in the mixing bowl except corn oil, beat at high speed till thick. Lower speed and slowly add in corn oil, mix well. 
2. Take out some plain batter (about 200g) and mix with some (1 tbsp coco powder + 1 tsp hot water - mix well) and blend well
3. Pour plain batter into Swiss roll square (lined) tray to about 1/2 inches high and remaining plain batter to 7" round (lined) cake tin
3. Pour the chocolate batter into piping bag and pipe straight lines on the Swiss roll square tray
4. Bake the square tray at 180C for about 15 mins and 7" round cake tin for about 25 mins
5. Remove sponge cake from tin and tray immediately after baked and leave to cool.
6. Cut the square sponge cake into 3 slices to about the width of 5cm

Ingredient: Mango Mousse
150g Mango puree (sweetened)
13g Gelatin powder
30g Water
40g Sugar
1 tsp Mango flavor

220g Fresh whipped cream

Method:
1. In a pot add mango puree, water, sugar and gelatin powder together and bring to boil till gelatin and sugar dissolved. Leave to cool in a large bowl and set aside. 
2. Whip fresh cream to soft peak and mix into the mango mixture with a hand whisk.

 Assembling the cake:-
1. Fresh mango, cut cubes
2. Lay the first layer of the round sponge cake at the bottom  and place the 3 slices of square sponge cake at the side
3. Pour some mango mousse onto the sponge cake and sprinkle half of the mango cubes on top and spread evenly with the back of a spoon. Make sure the mousse fill the gap between the sponge
4. Lay the second layer of the sponge cake onto the mousse, spread mousse again and sprinkle the remaining mango cubes on top and cover with the last slice of sponge cake on top and spread remaining mousse on it
5. Use a scraper to level the top and make sure there is about 1/4 inches left at the top of the cake ring for the mango puree topping
6. Chill the cake for at least 4 hours or till overnight.
I am not showing the jelly part because my didn't set well.

If you notice the mango only appear somewhere behind and not throughout the cake 
because i FORGOT to put in when i assembling the cake =.=" 
so i simply squeeze in some mango which i JUST cut before start assembling the cake.......... :( 

Tuesday 17 April 2012

Carrot Cake with Lemon Creme Cheese Frosting

I baked my sister all time favorite carrot cake to celebrate her birthday because nowadays i am my house baker ... haha

This cake is not hard to make and whole process i am using just a wooden spoon and whisk, no electrical mixer. Partly the reason i am going all manual because my princess is "helping" me in the kitchen... so it is dangerous to use electrical mixer :)  

photo taken using my iPod because HB forgot to bring camera :(
and the deco funny right... hahaha... because my mom said the cake looks too pale (Lemon creme cheese) 
so put some pineapple to make some color ... hahaha.... COOL  right =.="

Recipe adapted from Nasi Lemak Lover with some personal adjustment :)
Ingredient - Carrot Cake
150g finely shredded carrots
130g Low protein flour (The store keeper told me it is same as All purpose flour)
1/2 tsp baking powder
1/2 tsp baking soda
1/2 tsp salt
60g caster sugar
50g brown sugar 
1/4 tsp nutmeg powder
1/4 tsp cinnamon powder
100ml corn oil
1/2 tsp vanilla extract
2 eggs, lightly stir
50g walnut, chopped
40g raisins 

Method:
1. Sift flour, cinnamon, nutmeg, baking powder, salt and baking soda in a mixing bowl set aside
2. Combine carrots, walnuts and raisin and mix with 1 or 2 table spoon of flour and make sure all covered with flour and set aside
3, Beat eggs, caster sugar and brown sugar till pale and fluffy and add in corn oil and vanilla extract till mixture well combined
4. Fold in flour mixture until well combine and last add in carrots mixture
5. Pour into line baking pan, bake at pre-heated oven 180c for 40mins
6. Cool completely before apply frosting

Lemon creme cheese making refer here How to


 Sister make wish like 'Oh no, no eye see... need to eat meimei's cake" hahaha 
and force to cut the cake with such huge knife because i forgot to put in cake knife... hohohohoho

HAPPY BIRTHDAY SISTER... LOVE YOU :) MUAK MUAK

Lemon Creme Cheese

Ingredient:
150g cream cheese, at room temp (very important)
40g butter, at room temp (very important also)
50g icing sugar, sifted
1 tbsp lemon juice (usually i use half of the lemon juice)
Lemon zest from 1 lemon

Method
1. Beat cream cheese and butter till light and creamy.
2. Add in icing sugar and mix well on low speed.
3. Add in lemon juices and lemon zest, combine well.
4. Store in fridge for later use.

Note: If the creme cheese and butter not in room temp, then it will not be able to beat until light and creamy

Sunday 15 April 2012

Vanilla Cupcake

I baked these for my girl's snack time tomorrow at kindergarten. She simply love it and i simply love it too because this is so easy and simple to bake :D
Ingredients:
125g Self raising flour
125g Unsalted butter
85g Caster sugar
2 eggs
1 tsp Vanilla essence
3 tbsp Milk

Method:
1. Preheat Oven 180C
2. Whisk the butter, sugar and vanilla essence together using an electric hand whisk until pale and creamy. 
3. Gradually whisk in the eggs until just combined. 
4. Add the flour and milk and whisk again until combined and fluffy.
5. Scoop batter into cupcake cup and bake in the for 20mins until golden and risen.

This is so delicious with a cup of hot honey lemon :) 

 Recipe refer Jane's Corner

Sunday 1 April 2012

3D princess cake

A friend of my asking me to help her bake 3D princess cake for her gal's birthday and without 2nd thought i agreed. :) Not that i bake before or money, but i simply LOVE the challenge.. haha
I did a lot of research on how to bake 3D princess cake and i bookmarked those design that i think i will do the same... haha... but the outcome not quite same because it is quite HARD to pipe on the butter cream =.=" But anyway, i am quite satisfied with the design... consider good la for 1st timer. ;) give faaaaceeee
 :) Princess standing on the grass with ladybug :) 

I baked this cake with moist choc as based since my friend gal love choc cake. I use 2 different recipe for the cake as i am not expert yet to play around with the ingredients to suite the baking pan that i am using. Therefore, no choice to use different recipe :D haha

Using small star tip to decorate princess's dress. :)

Princess skirt:-
I am using the recipe from my previous post Moist Choc. The only things i change was baked with cake with lower heat for 30mins extra because the surface of the pan is very very small so the cake might not cook if didn't bake extra with lower heat. 

Princess cake based:-
Ingredients:-
(A)
200g Lukewarm water
50g Cocoa Powder

(B)
190g Cake flour
2 tsps Baking Powder
1/4 tsp Salt

(C)
170g Butter
190g Sugar (reduce from original 250g)
3 eggs (medium size)

Method:
1. Combine (A) and set aside.
2. Beat butter and sugar till light and fluffy and add in eggs one at a time
3. Add in (B) mixture alternately with (A) mixture. Always start and end with dry ingredients
4. Pour into two 9" round pans and bake at 180'C for 25-30 mins
5. Cool and sandwiched the cake with alittle frosting.
 Recipe refer Reese Kitchen

 If you see probably, barbie skirt was not frosted completely because i LAZY... :D

Vanilla ButterCream

This is the simplest butter cream but this is less stable as it will melt while you are frosting your cake in this hot weather. :(

Ingredients:-
250g Salted/Unsalted butter 
450g Icing sugar
1 tbsp Vanilla essence 
2 tbsp Milk/heavy cream
 
Method:
1. Cream Butter and Icing sugar in low speed. Once icing sugar incorporated, increase the speed to medium and beat for1 mins
2. Add in Vanilla essence and mix well
3. Add milk/heavy cream by tbsp and beat everything together until creamy and fluffy about 1 mins  

Saturday 31 March 2012

Gingko, dried beancurd skin & balrey dessert (白果腐竹薏米糖水)

Haha, by looking at the title it is like something very sophisticated right?! Actually this is not. This dessert i ate a lot during my pregnancy, as it seems it will helps for baby skins. hmm... i really not so sure about that ler...:(

But this dessert is very nice and i love it so much :)


Ingredients (A):
70g barley/ jobstears seed (washed)
1-1.5 liter water (based on own judgement)
4 pandan leaves (washed and tied up a knot)

Ingredient (B):
350g water
120g yellow can sugar
4 pandan leaves (washed and tied up a knot)

Ingredients (C):
30 gingko nuts (break shells, soak and remove skin and remove bitter core)
75g dried beancurd skin – approx 1 big piece (break into small pieces, soak until soft and drain)
1 egg (add in 1 tsp water and lightly beaten)

Methods:
1) Bring ingredient A to boil, reduce to low heat and continue to simmer for 30-45 mins.
2) At the same time, bring gingko nuts and ingredients B to boil and reduce heat to medium for 20 mins, till gingko nuts are cooked and softened. Remove pandan leaves and set aside (including the sugar syrup).
3) When the barley splits open (softened), remove pandan leaves. Add in gingko nuts (with the sugar syrup) and soaked beancurd skin, cook for another 5 mins. Taste (add in more rock sugar if necessary).
4) Bring the heat to high for 5 seconds and turn off the heat. Immediately, add in the beaten egg slowly (like a tiny stream) and use a spatula to swirl the dessert in clockwise until the shredded eggs (蛋花) can be seen on the surface. Serve.

Recipe adopted from food-4tots

Wednesday 21 March 2012

Honey Cupcakes

Today i wanted to bake something simple, easy yet delicous. I came across this beautiful cupcake from Anncoo Journal blog so immediate i decided to bake this, also because my girls they adore cupcake :) maybe for them it is cute :) hehe

I baked it in small cup which allows me to makes 30 small cup :) and if according to the original recipe and bake in big cup it will only makes 10. I like to bake in small cup to attract my girl to eat it. ;) *wink*

This is the simplest recipe i had ever tried so far and this is definetly a keeper :) yummy

Ingredients:-
125g Butter (softened)
90g Caster sugar (i reduce from original recipe)
1 tsp vanilla extract
1 tbsp Honey
2 Eggs
185g Super fine flour (Original called for plain flour)
1 tsp Baking powder
125ml Milk

Method:-
1. Pre-heat oven 170C
2. Shift flour and baking powder together and set aside
3. Beat butter, sugar, vanila essense and honey until light and creamy
4. Gradually add the eggs and beat until well combined
5. Add flour mixture and milk alternaltely and beat until just combined (Do not over beat it, else you will get dense cake)
6. Spoon batter into cupcake cup and baked for 25mins or until skewer comes out clean.
7. Cool on the rack before serve

Recipe adopted from Anncoo Journal

Monday 19 March 2012

Orange cake and Orange swiss roll with orange cream cheese

When i first read this blog, 1st thing come to my mind was i am going to bake Rio - Blu cake for my girl for her coming birthday 1st June. She will definetly love it. :) and quickly i search Youtube and found a link teaching how to deco a cake to look like Rio - Blu - BOOKMARKED already. hehe...

Why i link this to my girl birthday cake?! Because i wanted to bake orange cake which is not so rich in favor and it is soft to eat because this is using chiffon matters, and best things was Wendy (blogger name) not using artificial coloring. :) Using blueberry to replace the color and this is a brilliant idea. :) love it ..

I am very satisfied with the cake texture, but not satified at all with the Orange Cream Cheese filling. :( sigh
Swiss roll still ok because i spread less orange cream cheese filling but i spread more to the cake. therefore you will feel the bitterness of the orange skin. So next time will not pandai-pandai replace the kumquat (original recipe called for kumquat) to orange. hehehe :P

  Ingredients: Orange sponge

Yolk batter
7 egg yolks
35gm sugar
70gm vegetable oil
70gm orange juice
1 Tbsp orange zest
140gm cake flour
½ tsp baking powder

Meringue
7 egg whites
70gm sugar
1/2 tsp cream of tartar


Method:
1. Preheat oven at 160(fan)/180C. Prepare an 7 inch pan. Line the base only.  10" X 14" swiss roll pan, and line.
2. Prepare yolk batter. Combine all the wet ingredients + sugar + orange zest. Sift cake flour + baking powder together and combine with everything until a smooth batter forms.
3. Prepare meringue. Beat egg whites with cream of tartar until soft peaks and beat in sugar gradually until stiff peaks form (hooked peak).
4. Prepare final batter. Fold ¼ of meringue into yolk batter until well combined. Repeat with another ¼. Pour the yolk batter into remaining meringue and fold until well combined (Fold not stir and it should look very foamy). Pour batter into prepared pan.

7" round pan:-
5. Bake the cake for 30-35 minutes or until done. Remove from oven and let the cake totally cool before removing cake from pan.

6. Slice cake into 2 slices and fill with orange cream cheese filling. Cover and chill for 2 hours minimum.

10" X 14" swiss roll:-
5. Bake the cake for 20-35 minutes or until done. Immediately invert it on rack after removal from oven. Leave to cool (about 10 minutes). Remove the baking paper and let it cool completely.
6. Spread the orange cream cheese and hold the cake with both hands and roll gently.
7. When swiss roll is rolled up, make sure the ending portion facing downward. Keep the roll in the refrigerator at least 30 mins before serve. 

 Original recipe : Table for 2 or more...

Orange Cream Cheese

Original recipe called for kumquat, but i do not have it on hand. I had search Tesco, giant and carefour still cannot find, guest it is not seasson now. :( so i pandai-pandai replace it with 1/2 orange with skin on. :P and the result was amazing.... BITTER. :(  hehe

Anyway, i will try again using kumquat because my house kumquat going to ripe soon. Yeah....

Ingredients:
10 kumquats ( I replace with 1/2 orange with skin on)
½ cup water or more
25gm sugar or more (depending on the kumquat’ s taste)
125gm cream cheese, room temperature
60gm butter, slightly softened


Method:
Beat cream cheese and butter until smooth. Beat in cold kumquat puree. Taste it. If not sweet enough, add some caster sugar and beat a while. Use this to fill cake.

Note:-
Do this step in advance. Half kumquats and remove seeds. Slice them thinly and place in a saucepan together with sugar and water (amount should cover the sliced kumquats nicely, if not, add more). Bring to a boil and lower heat to simmer until kumquats are soft. Blitz the kumquats together with the syrup until a coarse puree forms. Let it cool down. It should be at the consistency of ketchup. Cover with plastic wrap and chill in fridge, it will further thicken.

hehe, i do not border to change the word kumquat to Orange because it is a NO GO and please do not replace it. :P

Original recipe: Table for 2 or more...

Monday 12 March 2012

Mini Pandan Kaya Swiss Roll

Finally today i have time to bake this after few weeks of sick, busy with works and etc... actually i read this blog long time and bookmarked it immediately because my girl love to eat swiss roll. Usually kindy will provide those brought from hypermarket which i do not like her to eat it. Just imagine manufacturing date Jan'12 and expiring on Dec'12. WHAT!!!!!!!!!! OMG... please do not give it to my girl. :(

So i decided to learn and bake swiss roll myself so i can give her bring to kindy as snack. :) I am quite happy with the look and taste and my girl also approve it. :p haha

See how small i am :) can be fit into the 'soup' spoon. haha

Recipe adapted from Vivian Pang kitchen 
Ingredients:
(A)
3 egg yolks
1 tbsp (15g) sugar
1/4 tsp salt
30g vegetable oil (2 tbsp)
35ml pandan juice (2 tbsp + 1/2 tsp)

(B)
65g cake flour 

(C)
3 egg whites
1 tbsp (15g) sugar

(D)
Kaya for spreading

Method :
1. Pour egg yolks and sugar in a bowl. Whisk till sugar dissolves.
2. Add the remaining ingredients in (A) into the bowl. Stir well.
3. Fold in sifted flour. Mix till smooth.
4. In another bowl, whisk the egg whites till frothy. Add sugar gradually and beat till stiff.
5. Fold in 1/3 of the whites into the yolk mixture till well incorporated.
6. Pour in the remaining egg whites and fold gently till well combined.
7. Pour batter into a swiss roll tray (10" X 14") lined with greased baking paper. Smooth the surface with a scrapper. Bake in the pre-heated oven 160C for 20-22 minutes. 
8. Immediately invert it on rack after removal from oven. Leave to cool (about 10 minutes). Remove the baking paper and let it cool completely.
9. When the cake has cool down, used a knife to slit 2 lines, but the cake is still attached to each other. Spread kaya evenly on the surface. Leave 1cm remain unspread.
10. Hold the cake with both hands and roll gently. Since the pan is rectangle size so roll it from the long side to get a mini roll. If you wish to have a normal size roll then just roll it from the short side.
11. When the swiss roll is rolled up, make sure the ending portion facing downward. Keep the roll in the refrigerator at least 30 minutes before cut and serve.

Tuesday 28 February 2012

Guava with Sour Plum

I brought 2 organic guava which cost me RM5. Cheap? Expensive? Honestly i do not know, as i only know i feel like eating so i brought it. This is simple yet delicious to eat especially eating it straight out from fridge.. yum yum... cooling.


There are no special receipe for this because it just need guave (skined and sliced it) and sour plum. Toss both together and chill in the Fridge  Remember to cover it, else you will get 'smell' from the fridge, unless your fridge is ONLY store fruits then you can leave it open. ^ ^

Wednesday 22 February 2012

Came across this article and find it very interesting and worth keeping and sharing 
I do not know about you, but for me this is very true 
and i use this powerful words once in a while and especially FINE to end the argument

In case you cannot read it probably, here you go:-
5 Deadly Words used by Women
1. FINE = This is the word women use to end an argument when she knows she is RIGHT and YOU need to SHUT UP
2. NOTHING = means SOMETHING & u need to be WORRIED
3. GO AHEAD = this is a DARE, not permission. DO NOT do it.
4.WHATEVER = is a women's way of saying SCREW YOU
5. THAT'S OK = she is thinking long and hard on HOW & WHEN you will pay for your mistake.

But for men... no substance and not like women so sensible and complicated
5 Deadly words used by the Men
1. FINE - this is word men use when he surrender eventhough he is right 
2. NOTHING = means exactly NOTHING
3. GO AHEAD = this is a permission to do. But if you have any trouble do not come see me
4. WHATEVER = actually this is a word to describe he's so lazy to have a fight with women
5. THAT'S OK = actually this is a buildup word for somebody... ex: That's OK you can try it again. 
See why men are so fragile and destructible when confronting a women, it is because they are so INNOCENT.. pui

Moist Chocolate Cupcake

I have one of the colleague who is leaper because his birthday fall on 29th Feb and it only happens once in 4 years (Leap February) (Leap Year Information). For me birthday is a very special day regardless of your birthday falls on special or non-special date. This date is the SPECIAL date itself, because you brought to this world, and without this date. WHO ARE YOU and WHERE ARE YOU?!

So i chatted with him and he requesting me to bake him this Moist Chocolate Cuppy. WoW, someone is requesting me to bake him something (outsider i mean)... hehe.... i kind of prove of myself so i agreed. hohoho... and also i can practice more on my baking skills 


Ingredients:
110gm  cake flour
25gm cocoa powder
1/2 tsp baking powder (heap)
1/4 tsp baking soda (level)
1/4 tsp salt (level) ~ i ignore this since i am using salted butter

100gm butter
170gm fine granulated sugar
1 tsp vanilla essense
2 eggs (B size)
125ml cold milk/water

Method:
1. Mix butter about 1 min, add in sugar and vanilla essence and cream until till fluffy
2. Add in egg 1 at a time. Beating well after each addiction
3. Add shifted dry ingredients and milk alternately, mix well combined
4. Pour batter into lined and greased 12 muffin pan
5. Bake at 180C for 25mins

Noted: Leave cupcake completely cold before frost with desire frosting.

This time i frost with chocolate ganache, and you can find the recipe here. 

How To Make Chocolate Ganache

This is the easier and delicious chocolate ganache. You can make and frost on anything you like :) from cake to cupcake or you even can eat it with biscuit :) yummy-licious

Ingredients
113gm of Semisweet Chocolate Chips
75gm of Heavy Cream
1 tsp of Butter, softened at room temperature
1/8 tsp of Salt (I omit this as i using salted butter)

Method:
1) Heat the cream in a small pan over medium heat until just below boiling point.
2) Pour cream over chocolate chips and let sit for 1 minute. Add the softened butter and whisk the whole thing together until the chocolate has fully melted. Let it sit for a few minutes before frosting or decorating any cookie or any other type of pastry.

Saturday 18 February 2012

Japanese Cotton Cheese Cake with Fresh Fruit Topping


This cake is my HB favorite so far. He has been pestering me for quite sometime and finally i move my a** to bake him this cake on Valentine day with the exchange of nice and expensive dinner. hohoho 

This cake is delicious enough to just eat plain and those not cheese lover will also love this cake (myself) because of the fluffy-ness, delicious-ness of the cake. hahahaha


Ingredients for cake:
125gm cream cheese
90ml milk
15gm butter

30gm flour
24gm cornstarch
3 egg yolks

3 egg whites
pinch of salt
1/8 tsp cream of tartar
75gm sugar

Method:
1. In a heavy saucepan, cook cream cheese, milk and butter until thick and smooth. Set aside.
2. Preheat oven at 160C. Boil some water.
3. After the cheese mixture has turned warm and mix in both flours. Stir with a whisk until smooth.
4. Put egg yolks into the cheese mixture and stir until well combined.
5. In another clean bowl, beat egg whites until frothy. Put in cream of tartar and beat until soft peaks, add in sugar gradually and beat until stiff
6. Fold 1/4 of egg whites into cheese mixture, and then another 1/4 of the egg whites.
7. Pour the cheese mixture into the remaining egg whites and fold.
8. Pour batter into a lined pan
9. Place cake pan into a slightly bigger, shallower pan. Fill the bigger pan with boiling water and put in oven to bake at 150C for 45 mins.
10. Unmould cake immediately upon removal from oven, if not, the cake will shrink a lot.

Ingredients for Topping:
1/2 tsp gelatin
1 Tbsp water
150ml whipping cream
2 tbsp sugar
Mixed fresh fruits, mango, orange, apple (basically any fruit you like)

1 Tbsp instant jelly
100ml water
1 tbsp sugar

Method:
1. Put water into a heatproof bowl. Sprinkle gelatin onto water. Wait for 2 minutes. Either heat it by double boiling or zap it in the microwave on high for 25 seconds. Leave gelatin mixture to cool down totally.
2. Freeze mixing bowl and beaters for 5 minutes. Remove mixing bowl and pour in cold whipping cream.
3. Beat whipping cream until visible streams can be seen. Pour in cooled gelatin mixture and sugar and beat until stiff peaks. Do not overbeat.
4. Mound whipping cream onto cooled cake. Top with diced mixed fruits. Chill cake in freezer for 10 minutes while you make the jelly topping.
5. Put water and sugar into a small saucepan, on medium heat, bring to a boil. Put in instant jelly powder and stir until fully dissolved.
6. Remove cake from freezer and glaze fruits with instant jelly solution. The jelly will firm up upon contact with the cold fruits.
7. Return cake to fridge and chill for another 2 hours before serving.

Recipe from :  Table for 2 or more
Related Posts Plugin for WordPress, Blogger...